

BC AL Journey #7
So far in our journey together we have modified existing tables and pages and we have created our own tables and pages. This time, we are going to merge them together and introduce a powerful tool in Business Central, the Flow Field.
We are going to add a few elements to the use case in Journey #6. I’ve highlighted them bold below. Also, I’m going to refer the Journey #5 a lot in this post.
Use Case
User would like to define different warranty details. The user would like an interface to manage all available warranty details, including a list of all warranties and a card view to edit. The user would like to associate one warranty with a sales document. The warranty needs to move to the posted sales invoice.
Implementation
- Create a new table that includes the fields:
- ID
- Name
- Description
- Create a List page to manage the records
- Create a card page to create and edit the records
- Extend the Sales Quote, Sales Order and Posted Sales Invoice to select a Warranty record
Test Plan
- Open the Warranty list
- Add a new Warranty
- Edit an existing Warranty
- Select a Warranty record on a Sales Order
- See the name of the selected Warranty on the Sales Order
- View the Selected Warranty Record on the Posted Sales Invoice.
- See the name of the selected Warranty on the Posted Sales Invoice.
To accomplish this goal, we are going to start at the data tier and add to the Table Extensions we created in Journey #5, ARDSalesHeader.TableExt.al and ARDSalesInvoiceHeader.TableExt.al.
We are going to add a field to hold the ID of the ARD_Warranty record, which we created as an Integer. We are also going to add a field to automatically get the name of the selected warranty.
Here are those two fields:
field(50001; ARD_WarrantyNo; Integer)
{
    Caption = 'Warranty';
    ToolTip = 'Selected order warranty';
    DataClassification = CustomerContent;
    TableRelation = ARD_Warranty."ARD_No.";
}
Field(50002; ARD_WarrantyName; Text[100])
{
    Caption = 'Warranty Name';
    ToolTip = 'Name of the selected Warranty';
    FieldClass = FlowField;
    CalcFormula = lookup(ARD_Warranty.ARD_Name WHERE("ARD_No." = field(ARD_WarrantyNo)));
}
The first field is the ARD_WarrantyNo field, which is an Integer just like the ID field on the ARD_Warranty table. The Caption, ToolTip, and Data Classification values all function exactly the same as the ones we added for the ARD_WarrantyExpDate field from Journey #5.
The new value in the ARD_WarrantyNo field is the TableRelation value. This value informs Business Central that this field connects to another table, and how that table is related to this value. This relationship can include filters and other details, but this is a simple implementation.
The next field is the ARD_WarrantyName field. Here we have a FieldClass value that declares this field as a FlowField. Flow Fields perform calculations on data and return a value that is displayed to the user. There are many types of formulas we can declare in a flow field like Exists, Count, Sum, Min, Max, Average, and Lookup.
For this example, we are going to look up in the ARD_Warranty table the ARD_Name text where the ARD_No. value equals the field on this table ARD_WarrantyNo.
If we were doing this in a SQL Statement it would look something like this:
SELECT ARD_Name
FROM ARD_Warranty
WHERE ARD_No. = SalesHeader.ARD_WarrantyNo
The data type and size of the ARD_WarrantyName field has to be the same as the field we are looking up. If it is smaller, then the system will complain, if it is larger, we are just wasting space.
The great thing about a flow field is that the data result isn’t stored in the database. In this example, if you change the name of the warranty later, the associated records will immediately reflect the change.
Add these fields to the fields scope on both Sales Header and Sales Invoice Header table Extensions. As we learned before, with the matching field signatures the data will automatically flow from table to table when the document is posted.
Adding the fields to the display is the same as adding the ARD_WarrantyExpDate field we created in Journey #5.
field(ARD_WarrantyNo; Rec.ARD_WarrantyNo)
{
    ApplicationArea = All;
}
field(ARD_WarrantyName; Rec.ARD_WarrantyName)
{
    ApplicationArea = All;
}
I added this to the Field scope on ARDPostedSalesInvoice.PageExt.al, ARDSalesOrder.PageExt.al, and ARDSalesQuote.PageExt.al.
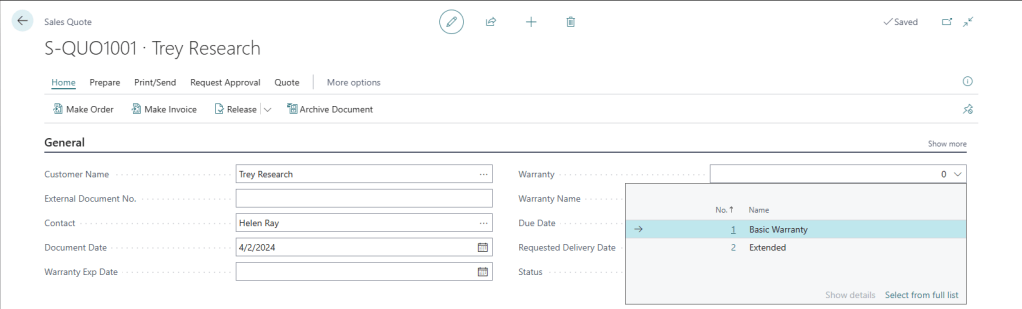
When we run the code now and look at the Sales Quote page we see this:
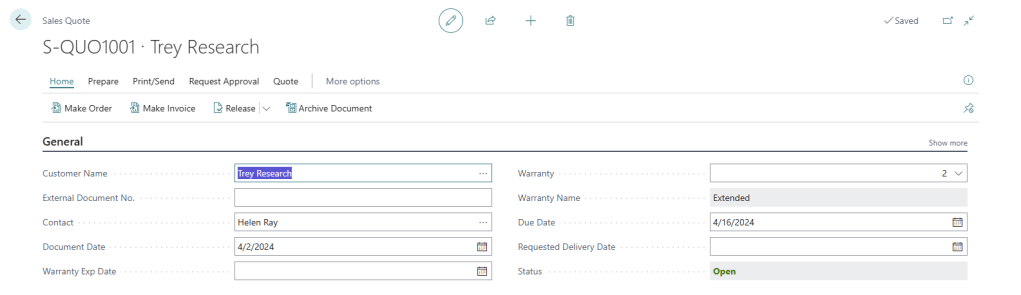
When we select a value and refresh the page, we see the Warranty Name is automatically populated. We will fix the refresh issue in a later lesson, don’t worry.
Continue to test and validate the functionality of the change through the quote to order and order posting process, just like we did for the Journey #5 customizations.
We have come a long way, excellent work, thanks for hanging in there. We have created four of the key components of a Business Central customization and are well on our way to more advanced topics.
Source Code: https://github.com/AardvarkMan/BC-Journey


Leave a comment