

BC AL Journey #13
At this point we have extended tables and created tables, we have extended pages and we have created card and list pages. The next element is the Part page, specifically the List Part. This is commonly used when we have a header and line system like a sales order and sales lines.
There are two Part Pages, a List Part which shows lines, and a Card Part which shows details. Like their List and Card counterparts in Business Central they are tied to tables.
Use Case
For each customer allow for the entry of multiple Warranty Claims. They need to be displayed in a list and allow for users to enter the data from the customer card.
We are going to continue to develop our application with some warranty tracking. Let’s define the requirements and get some code written.
Implementation
- Create a Warranty Claim table to track
- ID
- Customer No
- Description
- Details Text of 255 characters
- Date the claim was entered
- Date should default to the current date
- Boolean indicating if the claim has been resolved.
- List needs to appear on the customer card.
- The list should be in its own group labeled Warranty Claims
- The Group and list should appear after the General section.
Test Plan
- Enter a warranty claim on the customer record
- Check that the claim loads
- Check that the claim only appears on the correct record
We start, as always, with the data tier and a table. In BC AL Journey #9 we introduced the New AL File Wizard, where is what I entered into mine to create the file ARDWarrantyClaim.Table.al.
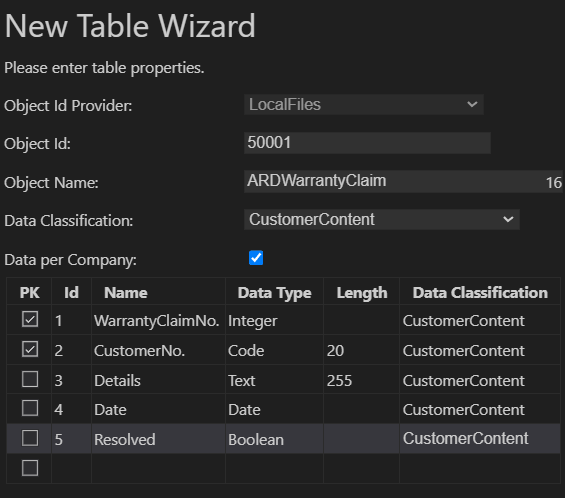
Note that I checked both the WarrantyClaimNo. and CustomerNo. as PK values. This is very important as we want to connect these records to Customers. There is a little BC AL Magic that kicks in later.
After the wizard is done, I cleaned up the Captions, Added Tooltips and an OnInsert trigger to set the default date. I also typed CTRL + SHIFT + P to bring up the Action Bar and used the “AL: Generate permission set as AL object containing current extension objects” command to update the permissions object.
Because WarrantyClaimNo. is one of the keys it must be unique. I’ve aded the AutoIncrement = true statement. This will form one half of our key, the second is the CustomerNo. Note that the Keys section has a PK that includes both the WarrantyClaimNo. and CustomerNo. fields.
namespace AardvarkLabs;

table 50001 ARDWarrantyClaim
{
    Caption = 'WarrantyClaim';
    DataClassification = CustomerContent;
    DataCaptionFields = "WarrantyClaimNo.", "CustomerNo.";

    fields
    {
        field(1; "WarrantyClaimNo."; Integer)
        {
            Caption = 'Warranty Claim No.';
            ToolTip = 'Warranty Claim Number';
            AutoIncrement = true;
        }
        field(2; "CustomerNo."; Code[20])
        {
            Caption = 'Customer No.';
            ToolTip = 'Associated Customer Number';
        }
        field(3; Details; Text[255])
        {
            Caption = 'Details';
            ToolTip = 'Warranty claim details';
        }
        field(4; "Date"; Date)
        {
            Caption = 'Date';
            ToolTip = 'Warranty Claim Date';
        }
        field(5; Resolved; Boolean)
        {
            Caption = 'Resolved';
            ToolTip = 'Indicate if the Claim has been resolved';
        }
    }
    keys
    {
        key(PK; "WarrantyClaimNo.","CustomerNo.")
        {
            Clustered = true;
        }
    }

    trigger OnInsert()
    begin
        Rec.Date := DT2Date(CurrentDateTime);
    end;
}
Back to the Wizard, I right clicked on the 2 – Page folder and using the Wizard I selected to create a new Page.
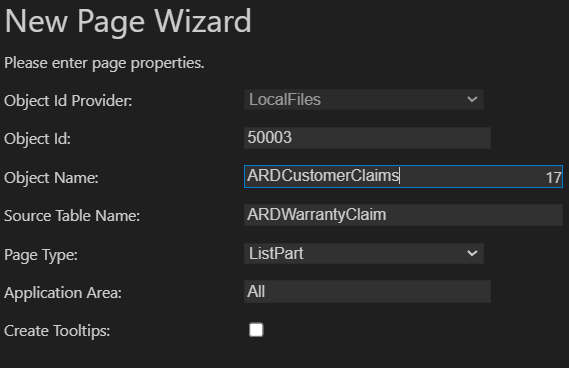
This will create ARDCustomerClaims.Page.al. Not that the page type is ListPart. Also, I have turned off the Create Tooltips option, as we created those on the table.
Clicking “Next” at the bottom of the page will prompt you to select which fields to add to the list.
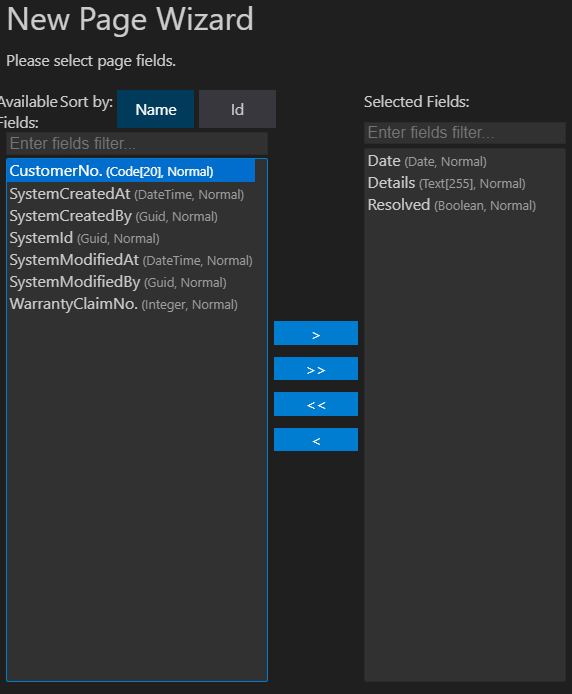
I added Date, Details, and Resolved. Clicking “Finish” will generate the file.
namespace AardvarkLabs;

page 50003 ARDCustomerClaims
{
    ApplicationArea = All;
    Caption = 'Customer Claims';
    PageType = ListPart;
    SourceTable = ARDWarrantyClaim;

    layout
    {
        area(Content)
        {
            repeater(General)
            {
                field("Date"; Rec."Date")
                {
                }
                field(Details; Rec.Details)
                {
                }
                field(Resolved; Rec.Resolved)
                {
                }
            }
        }
    }
}
To show this on the customer card we will need to extend the page. Right click on the 3 – Page Ext folder, select the New AL File Wizard and select Page Extension for the type.
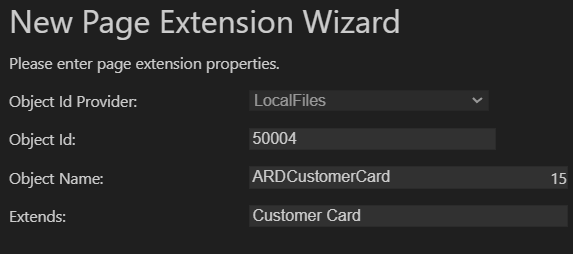
Click “Finish”.
The Wizard doesn’t give you much for the Page Extension, but it is a solid start. I’m going to add a new group after the General group and use a component called a “part”.
namespace AardvarkLabs;

using Microsoft.Sales.Customer;

pageextension 50004 ARDCustomerCard extends "Customer Card"
{
    layout
    {
        addafter(General)
        {
            group(ARDWarrantyClaims)
            {
                Caption = 'Warranty Claims';
                part(ARDCustomerClaims; ARDCustomerClaims)
                {
                    ApplicationArea = All;
                    SubPageLink = "CustomerNo." = field("No.");
                }
            }
        }
    }
}
We have added fields before, this is very similar. Here we tell it we want a “part”, we give it a name, and what object the part is. We created the ARDCustomerClaims part in the ARDCustomerClaims.Page.al file.
Critial to how a part works is the SubPageLink parameter. This value tells Business Central AL how to connect the data in the table to the part on the current record. What this says is that the part field CustomerNo. must equal the pages table (customer) record field No.
Now for that Magic I mentioned earlier, when we create a new record from the customer record, it automatically populates the customer id on the warranty claim record. This performs your data relationship work automatically!
Let’s run this and see how it looks.
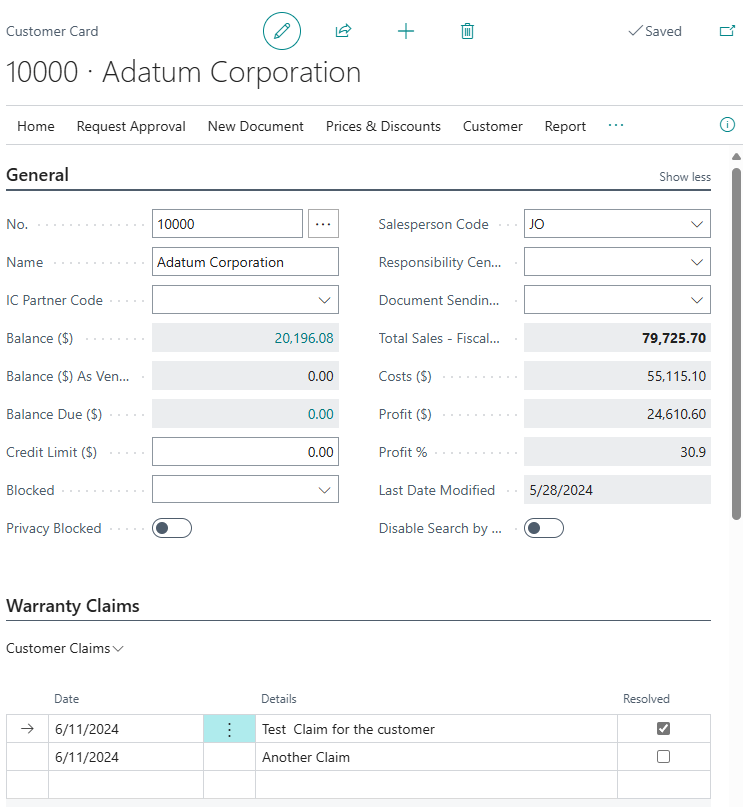
I entered a little sample data and there it is.
If I review from another customer record, I can see that the data is indeed isolated to the customer record we are viewing.
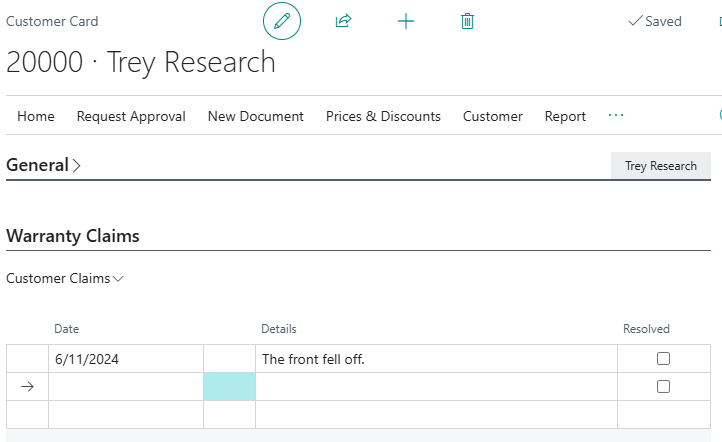
Here I’m confirming that the table data appears as we expected.
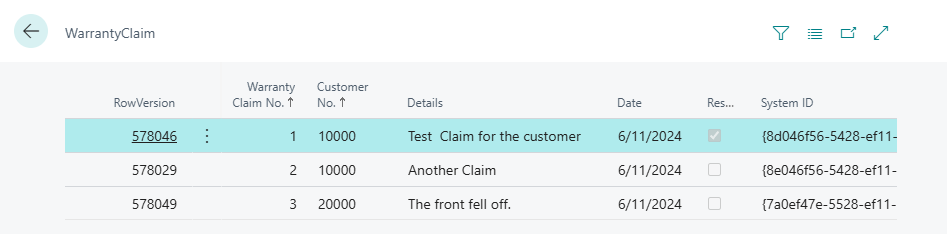
There we have it, a working list part. This is the way Sales Orders and Sales Lines are displayed, as well as many other sub lists. This is a very powerful feature, especially how the relationship management is managed based on the SubPageLink value.
We have made great progress so far getting a handle on the Business Cental user interface. There are more elements such as fact boxes that we have yet to cover, but the elements we have covered makeup the core of most pages we use.
Thanks for joining me.


Leave a reply to Business Events and Power Automate – Aardvark Labs Cancel reply