

Microsoft Excel is by far the most common application for handling data. Regardless of your opinion of Excel, how the graphs look, how the dates are handled, or anything like that, it is here, and people use it to handle data.
Excel Joke! The Optimist see the glass as 1/2 filled with water. The Pessimist sees the glass as 1/2 empty. Excel sees January 2nd.
Like other flat files like CSV and Tab Delimited, it is a challenge to express a header / line relationship in an Excel file. For our initial file import / export we are going to work with Items.
The first step is identifying what data is in each column. We will need this to static, in that the column order should not change. We can handle named header columns but that is a little complicated for our first file.
| Column | Data Value |
|---|---|
| Name | Text[100] |
| Type | Text[20] |
| Unit of Measure | Text[10] |
| Unit Price | Decimal |
Here is my Excel spreadsheet:

We are going to start by defining a staging table that we can import the data into. We could import the data into temporary item records, but we have some values we want to verify and communicate to the user with.
table 50003 ARD_ItemStaging
{
    Caption = 'Item Staging';
    DataClassification = ToBeClassified;
    TableType = Temporary;

    fields
    {
        field(1; "ARD_No."; Integer)
        {
            Caption = 'No.';
            ToolTip = 'Unique identifier for the item.';
            DataClassification = CustomerContent;
        }
        field(2; ARD_Name; Text[50])
        {
            Caption = 'Name';
            ToolTip = 'Name of the item.';
            DataClassification = CustomerContent;
        }
        field(3; ARD_Type; Text[20])
        {
            Caption = 'Type';
            ToolTip = 'Type of the item (e.g., Product, Service, etc.).';
            DataClassification = CustomerContent;
        }
        field(4; ARD_UnitOfMeasure; Text[10])
        {
            Caption = 'Unit Of Measure';
            ToolTip = 'Unit of measure for the item (e.g., Each, Dozen, etc.).';
            DataClassification = CustomerContent;
        }
        field(5; ARD_UnitPrice; Decimal)
        {
            Caption = 'Unit Price';
            ToolTip = 'Price per unit of the item.';
            DataClassification = CustomerContent;
        }
        field(6; ARD_Message; Text[1024])
        {
            Caption = 'Message';
            ToolTip = 'Message or error related to the item import.';
            DataClassification = CustomerContent;
        }
    }
    keys
    {
        key(PK; "ARD_No.")
        {
            Clustered = true;
        }
    }
}
In order to manage the import process I created a page ARDExcelImport.Page.al. The page is pretty basic, with an Import action that calls the ImportExcelFile procedure. This procedure is where all the parsing into the Temporary Item Staging records.
var
    TempItemRec: Record ARD_ItemStaging temporary;
    TempExcelBuffer: Record "Excel Buffer" temporary;

procedure ImportExcelFile()
var
    FileManagement: Codeunit "File Management";
    TempBlob: Codeunit "Temp Blob";
    SheetName, ErrorMessage : Text;
    FileInStream: InStream;
    ImportFileLbl: Label 'Import file';

    RowNo: Integer;
    MaxRows: Integer;
    TempDecimal: Decimal;
begin
    RowNo := 0;

    // Select file and import the file to tempBlob
    FileManagement.BLOBImportWithFilter(TempBlob, ImportFileLbl, 'Excel Item Import', FileManagement.GetToFilterText('All Files (*.xlsx)|*.xlsx', '.xlsx'), 'xlsx');

    //Need to see if the temp blob is uninitialized.
    if TempBlob.HasValue() = false then exit;

    // Select sheet from the excel file
    TempBlob.CreateInStream(FileInStream);
    SheetName := TempExcelBuffer.SelectSheetsNameStream(FileInStream);

    // Open selected sheet
    ErrorMessage := TempExcelBuffer.OpenBookStream(FileInStream, SheetName);
    if ErrorMessage <> '' then
        Error(ErrorMessage);

    //Read the sheet into the excel buffer
    TempExcelBuffer.ReadSheet();

    //Finding total number of Rows to Import
    TempExcelBuffer.Reset();
    TempExcelBuffer.FindLast();
    MaxRows := TempExcelBuffer."Row No.";

    TempItemRec.Reset();
    TempItemRec.DeleteAll();

    FOR RowNo := 2 to MaxRows DO begin //Assuming Row 1 has the header information
        TempItemRec."ARD_No." := RowNo - 1;
        TempItemRec.ARD_Name := CopyStr(GetValueAtCell(RowNo, 1).Trim(), 1, 50);
        TempItemRec.ARD_Type := CopyStr(GetValueAtCell(RowNo, 2).Trim(), 1, 20);
        TempItemRec.ARD_UnitOfMeasure := CopyStr(GetValueAtCell(RowNo, 3).Trim(), 1, 10);
        if Evaluate(TempDecimal, GetValueAtCell(RowNo, 4).Trim()) then
            TempItemRec.ARD_UnitPrice := TempDecimal;

        TempItemRec.Insert();
    end;

    ValidateData();
    RefreshPage();
end;
Line 20; we use the File Management code unit to import a BLOB (Binary Large OBject) file and create an InStream. The InStream is used with the Excel Buffer record to get the first Sheet Name. We the use the Excel Buffer again to open the Excel spreadsheet and read all the data.
Line 45 – 54; This is the process of iterating through the rows and retrieving the data from each column. To simplify the process there is a procedure to Get a Value at a Cell.
procedure GetValueAtCell(RowNo: Integer; ColNo: Integer): Text
begin
    TempExcelBuffer.Reset();
    If TempExcelBuffer.Get(RowNo, ColNo) then
        EXIT(TempExcelBuffer."Cell Value as Text")
    else
        EXIT('');
end;
This procedure takes a row and column and returns the value as text. Text is the easiest thing to deal with if we are unsure what data will be. We can always test a Text value and turn it into something else. We do this on line 50 where we use the Evaluate command to turn the text value into a decimal value.
At this point we have the data into the temporary staging table, but we have values we need to check, the unit of measure and the item type.
procedure ValidateData()
var
    UnitofMeasure: Record "Unit of Measure";
    Message: TextBuilder;
begin
    TempItemRec.Setfilter("ARD_No.", '<>0'); // Filter out the auto-increment field
    if TempItemRec.FindSet() then
        repeat
            if TempItemRec.ARD_Type = '' then
                Message.Append('Type is required.');

            if (TempItemRec.ARD_Type.ToLower() <> 'product') and (TempItemRec.ARD_Type.ToLower() <> 'service') then
                Message.Append('Type must be either Product or Service.');

            if not UnitofMeasure.Get(TempItemRec.ARD_UnitOfMeasure) then
                Message.Append('Unit of Measure does not exist.');

        until TempItemRec.Next() = 0;
end;
Here we evaluate if there is a good unit of measure and that the type is either Service or Inventory. We can write the issue into a Message field to allow the user to make corrections where needed.
Here is the process. We open Business Central and navigate to the Excel Item Import page.
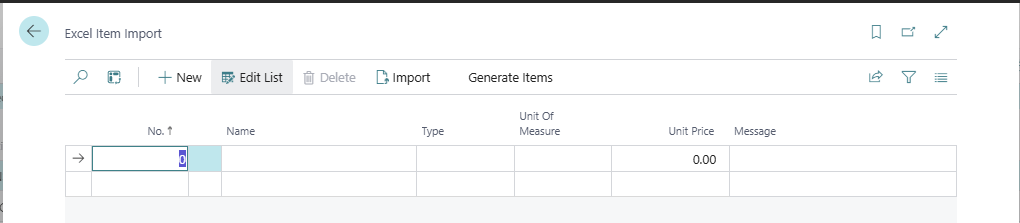
We click the Import button and select our Excel file.

We can see that there are no error messages, else we would need to correct them. The code should include some blocking actions and such to prevent attempting to create Items with bad data. For this example, we are going to trust humanity that they will see the error, fix it, and then import.
Behind the Generate Items button is a bit of code to read the Temp records and create Item records.
procedure GenerateItemRecords()
var
    ItemRec: Record Item;
    NoSeries: Codeunit "No. Series";
begin
    TempItemRec.Setfilter("ARD_No.", '<>0');
    if TempItemRec.FindSet() then
        repeat
            ItemRec.Init();
            ItemRec."No." := NoSeries.GetNextNo('ITEM');
            ItemRec.Description := TempItemRec.ARD_Name;
            if TempItemRec.ARD_Type.ToLower() = 'inventory' then ItemRec.validate(Type, Enum::"Item Type"::Inventory);
            if TempItemRec.ARD_Type.ToLower() = 'service' then ItemRec.Validate(Type, Enum::"Item Type"::Service);
            ItemRec."Base Unit of Measure" := TempItemRec.ARD_UnitOfMeasure;
            ItemRec."Unit Price" := TempItemRec.ARD_UnitPrice;

            // Insert the item record
            ItemRec.Insert();
        until TempItemRec.Next() = 0;
end;
When we click the button, we see the data in the Item list.
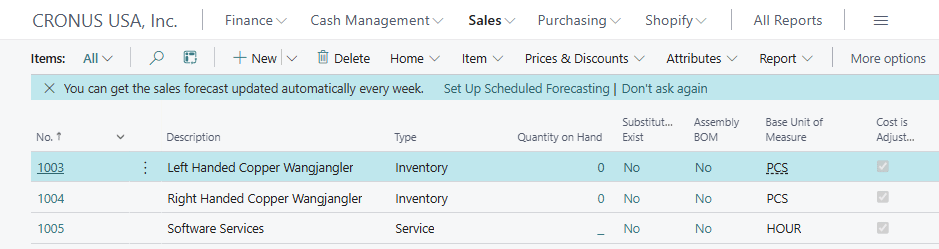
There we have it, from Excel to Items. There are other means to deal with Excel and Business Central, such as Edit in Excel. This method does allow you to take an Excel file from someone outside the organization and import in the data. This also allows us to add extra logic and validations to the imports, which is great when the source could be questionable.
I hope this example help you out. Let me know if you have any questions in the comments.
One more Excel Joke: Why do Excel users looks so good? Because they put SumProduct() in their hair.


Leave a reply to Importing Multi-Tab Excel Files into Business Central – Aardvark Labs Cancel reply